FoodThinger

Version .91
Created by RC Stanley 2006/2008
Released under the GPL
Download

Introduction

FoodThinger is a free software program for creating and maintaining a food storage plan.  Having an emergency supply of food provides peace of mind during times of unemployment or disaster.  Using FoodThinger, you can create food storage goals based on your family's needs then track your progress towards your goals. 
  1. FoodThinger
    1. Introduction
    2. System Requirements
    3. License
    4. Features
    5. Updates
    6. Download
      1. Current (download this version)
      2. Old
    7. Using FoodThinger
      1. Getting Started
        1. Creating a Food Storage Plan
          1. Adding family members
          2. Deleting family members
          3. Creating the plan
          4. The "Generate New Food Storage Goals" window
        2. Adding a Food
        3. Viewing Reports
        4. Exporting Reports
      2. The Pantry Window
        1. The Left Pane
        2. The Right Pane
        3. Adding a food
        4. Deleting a food
        5. Eating a food - Decrement by One
        6. Copy
        7. Edit
      3. Preferences
        1. General
        2. Store, Locations, Containers
          1. Adding a Store
          2. Renaming a Store
          3. Deleting a store
        3. Family
        4. Add New Food Item
        5. Cannery Categories and Weight
      4. Exporting your Pantry
      5. Converter
      6. Additional Help
      7. Known Issues
      8. Additional Resources / Licenses


System Requirements

License

FoodThinger is free and licensed under the GPL.

Features

Updates

There have been several changes since version .9 (updated 1/2/09):

Download

Current (download this version)

Description
Size
File
FoodThinger Installer   (includes FoodThinger and its database) version .91 this is the one you want
983 K
FoodThinger-Setup.exe
FoodThinger Source Code and associated files version .91 1476 K
FoodThingerSource.zip
FoodThinger Database (includes table descriptions) version .91 (database is identical to version .9)
451 K
FoodThingerDatabase.zip

Old

Description
Size
File
FoodThinger Installer   (includes FoodThinger and its database) version .9 1032 K
FoodThinger-Setup.exe
FoodThinger Source Code and associated files version .9  882 K
FoodThingerSource.zip
FoodThinger Database (includes table descriptions) version .9  451 K
FoodThingerDatabase.zip

Using FoodThinger

Getting Started

First, some quick definitions.  "Click" means to push the left mouse button.  "Right click" means to push the right mouse button.  Different levels of menus will be shown by ->  (for example File->Open means to left click on the word file at the top of the window then left click on the word open.)

Caveat: I have done my best to ensure the information in this program is accurate, but I am only human.  If you feel an amount FoodThinger recommends is too small, please buy more.

Creating a Food Storage Plan

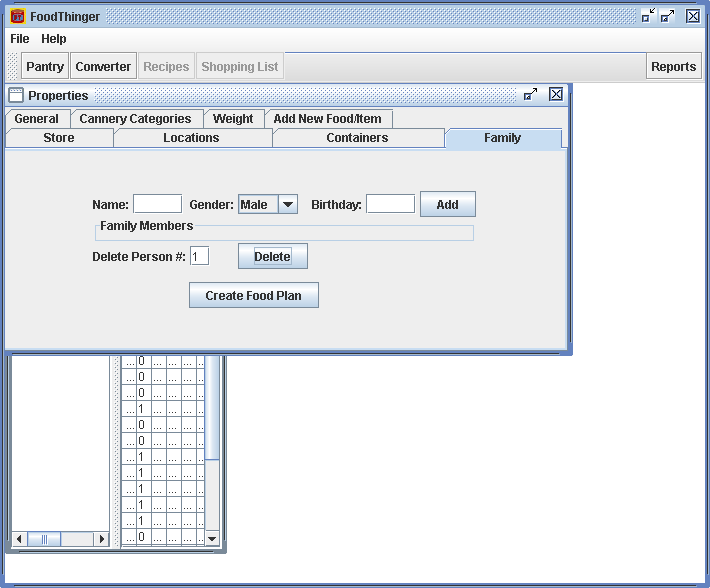
When you open FoodThinger for the first time, it will display the "Properties" window open to the "Family" tab.  (You can return to this window by selecting File->Properties.) 
image of properties window
Adding family members
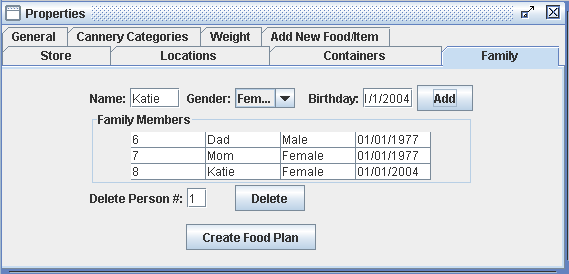
Enter your family member's name by typing their name in the box labeled "names", choose their gender from the drop down box, and enter his/her birthday in the box (MM/DD/YYYY).  Then click on the "Add" button.  His or her name will appear in the "Family Members" box. 
image of property window with family members added
Deleting family members
To remove a family member from the plan, type the id number of the person in the box "Delete #".  Then click the "Delete" button.
Creating the plan

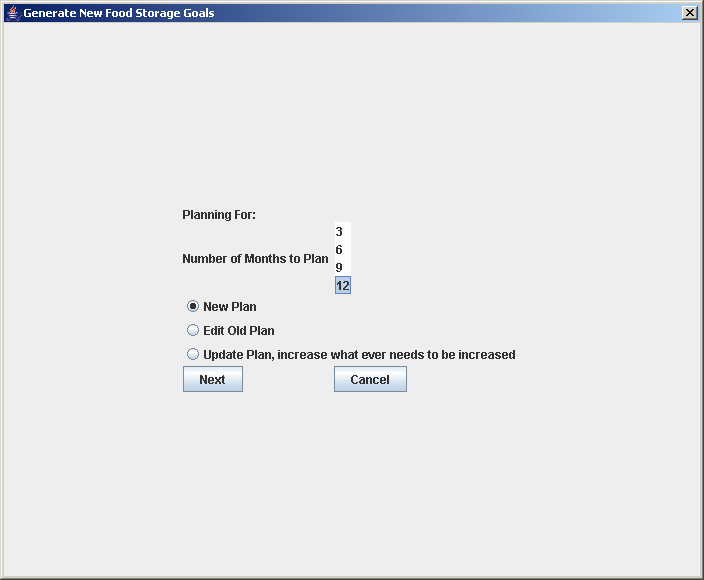
When you are finished adding family members, click on the "Create Food Plan" button.  Select the number of months you want to plan for by selecting the number of months in the "Number of Months to Plan" box.  Then select the "New Plan" option.  Click "Next".
dialog for food storage goals
The "Generate New Food Storage Goals" window
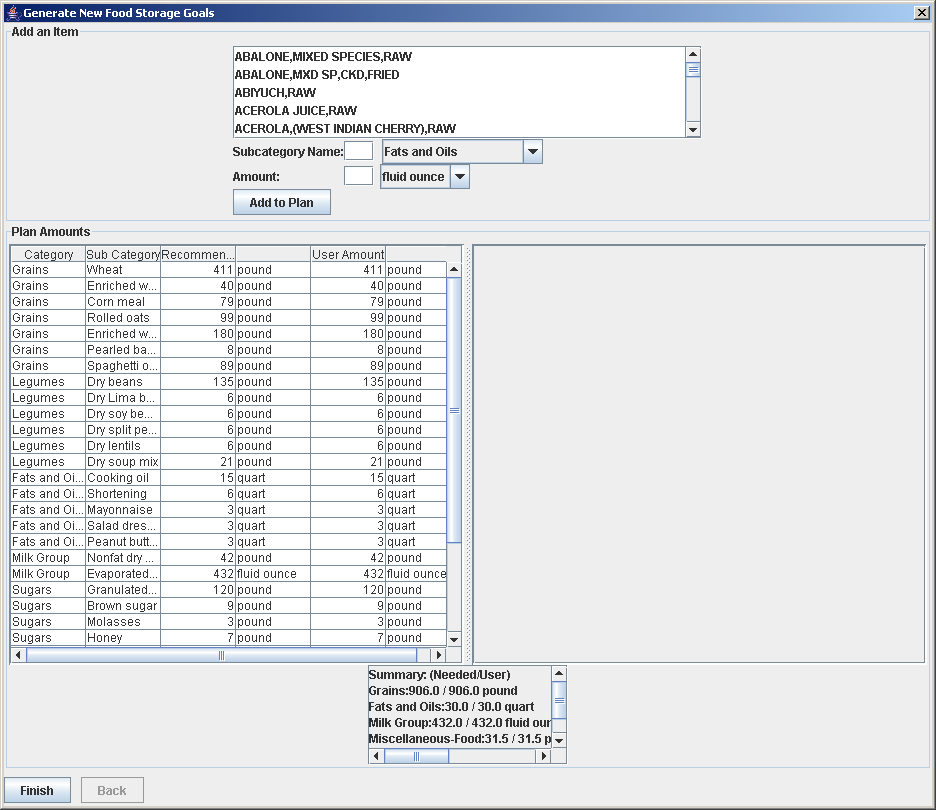
The "Plan Amounts'" area shows the types and amounts of foods in the plan.  To change an amount, click in  the "User Amount" column of the food you want to change, then start typing.  The "Summary" area shows you a quick summary of how much of each food is suggested and how much you currently have as your goal.  It will turn a category red if you have less than the recommended amount in any category.

If you want to add a food, use the "Add an Item" area.  Select the food you want, what category it is in and select a name for a subcategory.  You can also enter how much you want.  Click the "Add" button.  The food will be added to the "Plan Amounts" table.

Once you have your plan as you like it, click the "Finish" button.  You will be taken back to the "Properties" window.  You can now close this window by clicking on the "X".
a food storage plan

If you later need to add a new family member, go to File->Properties->Family, add the family member then select the "Generate Food Plan" button and go through the steps outlined above.

Adding a Food

In the main FoodThinger window, click on the "Pantry" button.  This will bring up the pantry window.  
shows pantry and add buttons

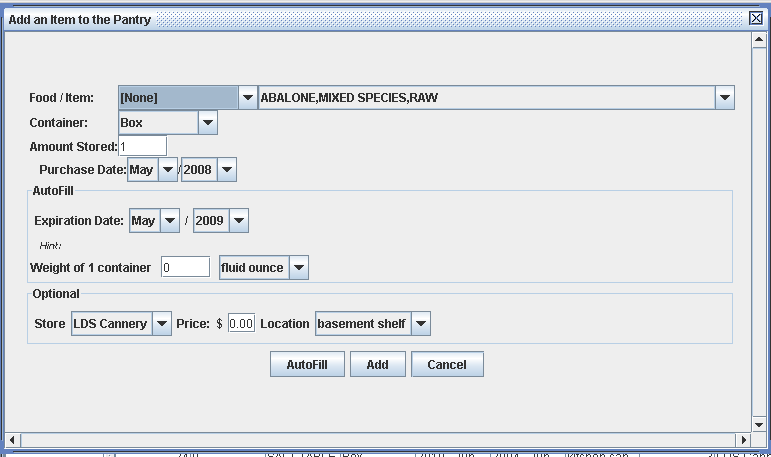
Click on the "Add" button..  This will bring up the "Add an Item to the Pantry" window.
adding an item to the pantry
  1. Select the food or item that you want to add from the "Food/Item" drop down boxes.  There are 2 drop down boxes.  The first is a list of common foods you might want to add.  If you select a food from the first box, it will automatically select the full name of the food.  The second drop down box is a list of all the foods in the database.  If the food you want to add isn't in the first box, you can look through the list of all foods.  (If you still can't find the item you want, you can add it by going to File->Preferences->Add New Food Item)
  2. Select the container your food is in (ex. #10 can, 5 gallon pail) from the Container drop down box
  3. Enter the number of containers you bought.
  4. Add the month and year the food was purchased
  5. (Optional) If you have selected a common food, such as wheat, you can click on the "AutoFill" button and skip steps 6 and 7.  FoodThinger knows the expiration dates and weights for many of the common food storage foods.  (Note: the furtherst FoodThinger will auto fill is 20 years in the future.)
  6. Select the expiration date for the food.
  7. Enter the weight of 1 container
  8. (Optional)  Select the store the food was bought from.  (You can enter a new store by going to File->Preferences->Stores. See Preferences.)
  9. (Optional) Enter how much the food cost
  10. (Optional) Select where you stored the food so you can find it later.  (You can enter a new location by going to File->Preferences->Locations.See Preferences.)
  11. Click the Add button.
  12. When you are finished adding foods click on the "Cancel" button or on the "x" in the corner of the "Add an Item to the Pantry" window.

Viewing Reports

FoodThinger provides several ways to check your food storage progress.  Click on the "Reports" button. 
where the reports button is located

(Warning: this window is very slow.  If it seems like it isn't responding, give it a few minutes.)
the reports window

Exporting Reports

If you want to view your reports in a spreadsheet or other program, you can export the information by clicking Export ->Export.  The information in the current (visible) tab will be exported.  The image below shows the export window for the "Totals" tabs. 
export report
Select which of the columns of the table you want to export.  Choose your delimiter (the symbol that will be put in between the columns.  A comma is a bad choice since many food names contain them). You only need a delimiter if you are exporting as a csv file.  Decide if you want the names of the columns included.  Choose your format: html or csv.  Html is the format for a webpage that you can look at in your web browser and print it.  Csv is the format to look at in Excel or other spreadsheet program.  Click the "Export" button. 

 Enter what you want the file to be named then click "Save". 

The Pantry Window

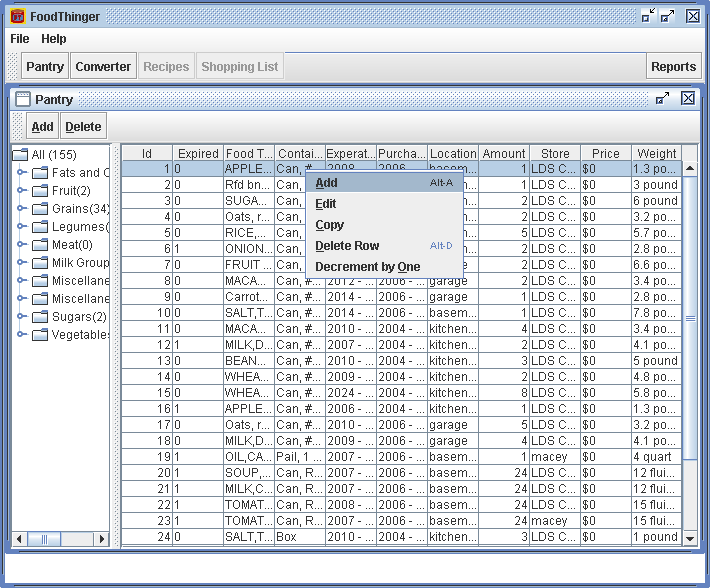
Click on the "Pantry" button.  This will bring up the pantry window.  picture of the pantry window

The Left Pane

On the left side shows the categories of food (Fats and Oils, Fruit, etc.).  The numbers in parentheses are how many of each item you have in each category.  If you select a category by clicking on it, you can see the food items just in that category.  If you click on the little circle next to the file folder icon, you can see the subcategories and how many foods are in each one.

The Right Pane

The right side shows information about the food stored.  It shows the id number of each food, if the food has passed its expiration date (1 means yes, 0 means no), the food name, its container, the expiration date, purchase date, location, how many you have, the store, the price and the weight.  If you click on one of the column headings, this sorts the list by that column.  If you click on the column heading again, it sorts the list the other way.  You can also resize the columns.

Adding a food

See Adding a food above.

Deleting a food

To delete a food, click on the row you want to delete.  There are two ways to delete a food.  You can  click on the delete button.  The other way is to click with the right mouse button.  This will bring up a menu.  Select "Delete Row".  (Warning: there is no undo, once you delete a food you will have to add it again.)

Eating a food - Decrement by One

Once you have eaten a food in your pantry, you will want to remove it.  You can either delete it as described above, or you can "Decrement by One".  For example, suppose you added three cans of wheat, so there is 1 row in the pantry that represents 3 cans of wheat.  When you eat one of the cans,  select the the row in the pantry, right click and bring up the menu, then select "Decrement by One".  This will change the row to show 2 cans of wheat.

Copy

Sometimes you have a food that you want to add again exactly as it is already in the pantry.  Select the row in the pantry by clicking on it.  Right click to bring up the menu.  Select "Copy".  A copy of the food will appear in the pantry.

Edit

You can edit the information in a pantry row.  Select the food you want to edit by clicking on the row.  Right click to bring up the menu.  Select "Edit".  A window exactly like the "Add a Food" window will appear.  Make your changes and click the "Update" button.

Preferences

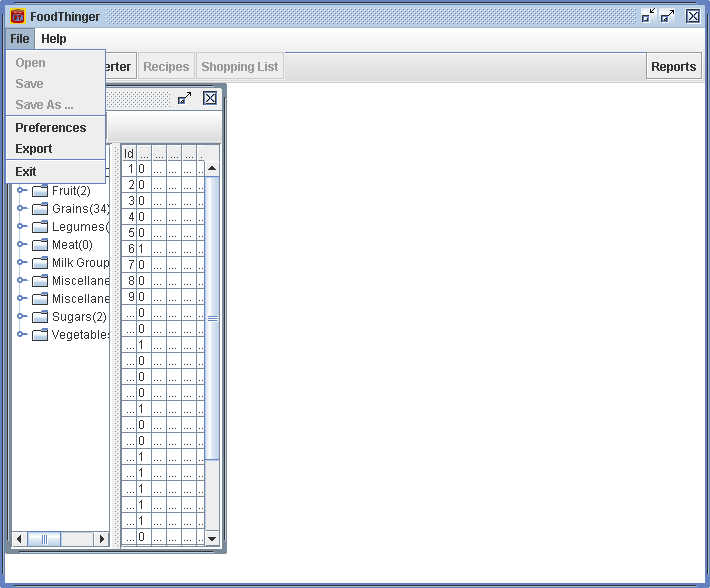
To get to the Properties window, select File->Preferences.
file menu

General

The "General" tab has one check box, "Treat expired items as still usable".  Check this box if you want items considered expired to still be included in your report totals.

Store, Locations, Containers

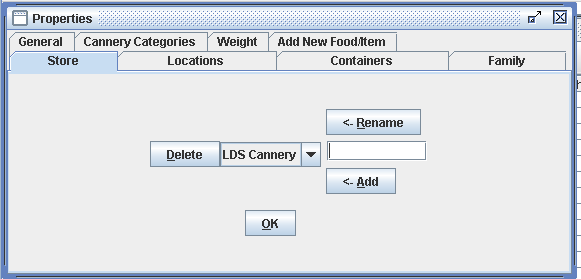
The Store, Locations, and Containers tabs all work the same way.  The instructions below are for the "Store" tab, but you would do the same thing for any of the tabs.
Select the "Store" tab. 
Store tab
Adding a Store
To add a new store, click in the text box and type the name of the store.  Click the "<-Add" button.

Renaming a Store
To rename a store, from the drop down box select the name of the store you want to change.  Click in the text box and type the name of the store.  Click the "<-Rename" button.  This will change the name of the store everywhere it occurs.

Deleting a store
To delete a store, from the drop down box select the name of the store.  Click on the "Delete" button.  Note: you cannot  delete the name of a store if a food in your pantry uses it.

Family

See the description under getting started.

Add New Food Item

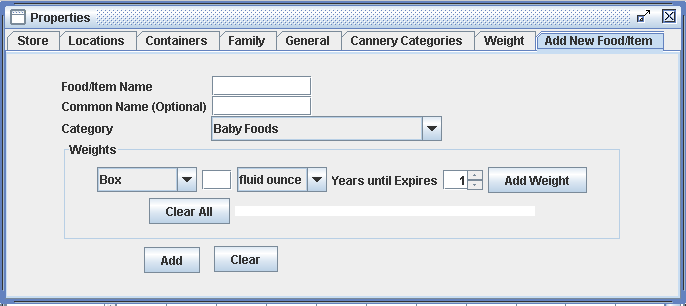
If you wish to add an item that isn't listed in the food drop down box, you can add it with this window.  (ex. sleeping bags, etc.)
add new food tab
Click in the "Food/Item Name" box and enter the food's name.  Click in the Common Name box and type a common name for you food (if desired).  Choose a category for your new food.  In the weights area, you can enter how much an item weighs.  You can enter several different weights for example, how much it weighs in a #10 can and how much it weighs in a 5 gallon bucket.  Click the Add button. 

Cannery Categories and Weight

This information will be available in a later version.

Exporting your Pantry

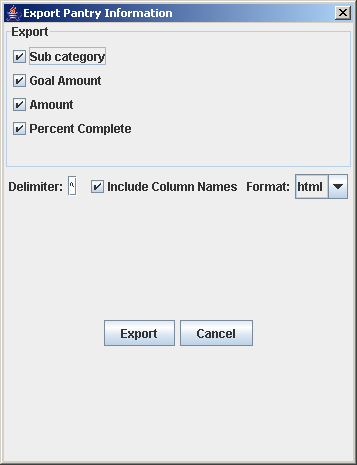
You may wish to export your pantry to another program.  Go to File->Export.  The "Export Pantry Information' window will open.
export window
From the Export area of the window, check the boxes for the information you want exported.  Choose a delimiter (a delimiter is a symbol that will show the divisions between different columns.  Do not choose a comma because commas are used in food names).  If you want the common name for the food to be used, check the "Use Common Name" box.  If you want the column names included, check "Include Column Names".  You might not want the column names if you are importing the information into another database.  Click the "Export" button. 
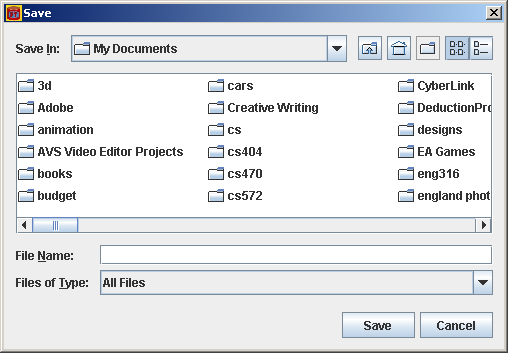
the save dialog
A save file window will appear.  Type the name of the file in "File Name" and click the "Save" button.

Converter

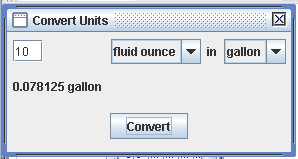
The converter allows you to convert between different measurements.  Click the "Converter" button.  The "Convert Units" window will open.
converter window
Click in the text box and enter the number you want to convert.  Select from the first drop down box the units the number is in.  In the second drop down box, select the units you want the amount to be in.  Click the "Convert" button.  The converted amount will be displayed above the convert button.

Additional Help

If you need additional help, or to report a bug, go to http://www.foodthinger.com or email support@foodthinger.com

Known Issues

There is a known issue with some video drivers not updating FoodThinger's windows correctly.  In English, this means when you scroll through your pantry, the text will get blurry.  Updating your video driver will fix the problem.

Additional Resources / Licenses

ProvidentLiving.com - lots of good information on food storage
USDA food database - used in FoodThinger (2006 version)
Chart2D - Java chart drawing program.  Released under the GPL.
SQlite java wrapper - the database FoodThinger is built on.  Here is its copyright notice for the wrapper:
This software is copyrighted by Christian Werner . The following terms apply to all files associated with the software unless explicitly disclaimed in individual files. The authors hereby grant permission to use, copy, modify, distribute, and license this software and its documentation for any purpose, provided that existing copyright notices are retained in all copies and that this notice is included verbatim in any distributions. No written agreement, license, or royalty fee is required for any of the authorized uses. Modifications to this software may be copyrighted by their authors and need not follow the licensing terms described here, provided that the new terms are clearly indicated on the first page of each file where they apply. IN NO EVENT SHALL THE AUTHORS OR DISTRIBUTORS BE LIABLE TO ANY PARTY FOR DIRECT, INDIRECT, SPECIAL, INCIDENTAL, OR CONSEQUENTIAL DAMAGES ARISING OUT OF THE USE OF THIS SOFTWARE, ITS DOCUMENTATION, OR ANY DERIVATIVES THEREOF, EVEN IF THE AUTHORS HAVE BEEN ADVISED OF THE POSSIBILITY OF SUCH DAMAGE. THE AUTHORS AND DISTRIBUTORS SPECIFICALLY DISCLAIM ANY WARRANTIES, INCLUDING, BUT NOT LIMITED TO, THE IMPLIED WARRANTIES OF MERCHANTABILITY, FITNESS FOR A PARTICULAR PURPOSE, AND NON-INFRINGEMENT. THIS SOFTWARE IS PROVIDED ON AN "AS IS" BASIS, AND THE AUTHORS AND DISTRIBUTORS HAVE NO OBLIGATION TO PROVIDE MAINTENANCE, SUPPORT, UPDATES, ENHANCEMENTS, OR MODIFICATIONS.


(c) 2008 RC Stanley
Looking for PingerThinger or FlowerThinger? Go Here